As many of you might already know that PostgreSQL is an open source powerful database and more and more it’s becoming popular not only on the developer’s personal project but also in the enterprise arena and hence there are lot best business practices a long with best security implementation guide lines that DBAs, Architects, and Developers need to keep in mind just like you would do and follow in a serious large scale Oracle project. So there is not anymore room to install all under the defaults.
For instance, once the best success on many aspects such performance and security for product such Oracle have been that we can customize and manually set storage at the table and tablespaces. Also you never want to user root to install or be the software and nor the installation owner for any application much less for such a critical product/applications such as the database software and objects. So these same principles and best business practices can be apply to projects using PostgreSQL, my personal opinion, I don’t see why not.
So to make the long story short here we go. BTW: basic assumptions and basic management commands will be found at the end of this page:
Create Groups and Users for PostgreSQL Database Software PostgreSQL user
1) Create Groups and User(s): Root Steps
groupadd -g 2004 dba
groupadd -g 2005 oper
groupadd -g 2006 postgres

useradd -m -u 1001 -g postgres -G dba,oper -d /home/postgres -c "D PostgreSQL Guy" -s /bin/bash postgres
passwd postgres

useradd -m -u 1103 -g dba -G postgres,oper -d /home/abaez -c "D Alf Guy" -s /bin/bash abaez
passwd abaez

mkdir -p /u01/app/postgres/pgsql-9.2 /u01/app/oracle/AgentEM12c /u02/data/postgres/dbase /u02/software/postgres

chown -R postgres:postgres /u01 /u02
chmod -R 775 /u01 /u02
Check reqired packages:
rpm -qa flex* bison bui* libreadline* zlib* libperl*
libreadline6-6.2-51.6.1.x86_64
zlib-devel-32bit-1.2.7-2.1.2.x86_64
zlib-devel-1.2.7-2.1.2.x86_64
zlib-32bit-1.2.7-2.1.2.x86_64
zlib-1.2.7-2.1.2.x86_64
libreadline6-32bit-6.2-51.6.1.x86_64
flex-2.5.35-62.1.5.x86_64
flex-32bit-2.5.35-62.1.5.x86_64
bison-2.5-8.1.3.x86_64
## postgres Steps make sure sudo is added
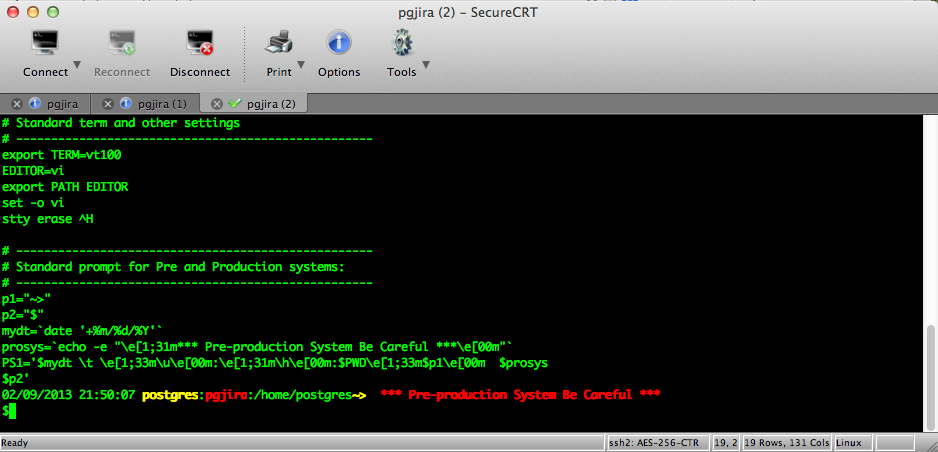
Also make sure you at least do some light customization for your user(s) on the build pre-production servers, for instance all my development/testing boxes are treated like pre-production so
I make sure this profile for all users is implemented at first on every-box server:
02/09/2013 20:51:58 postgres:pgjira:/home/postgres~>  *** Pre-production System Be Careful ***
$cat .bash_profile
#!/usr/bin/bash
# ---------------------------------------------------
# .bash_profile
# ---------------------------------------------------
# OS User:      jbaez
# Application:  DNS-DHCP-NTP
# Version:      Oracle 11g release 2
# Host:         node1: uracops1
# ---------------------------------------------------

# Get the aliases and functions
if [ -f ~/.bashrc ]; then
      . ~/.bashrc
fi

# ---------------------------------------------------
# Standard term and other settings
# ---------------------------------------------------
export TERM=vt100
EDITOR=vi
export PATH EDITOR
set -o vi
stty erase ^H

# ---------------------------------------------------
# Standard prompt for Pre and Production systems:
# ---------------------------------------------------
p1="~>"
p2="$"
mydt=`date '+%m/%d/%Y'`
prosys=`echo -e "\e[1;31m*** Pre-production System Be Careful ***\e[00m"`
PS1='$mydt \t \e[1;33m\u\e[00m:\e[1;31m\h\e[00m:$PWD\e[1;33m$p1\e[00m  $prosys
$p2'
02/09/2013 21:50:07 postgres:pgjira:/home/postgres~>  *** Pre-production System Be Careful ***
$
The user’s screen will have helpfull prompt with colors and informative hints:
Greenplum Server
2) Get the PostgreSQL 9.2 Source Code:
Go to http://www.postgresql.org/ftp/source/v9.2.2/ and pull down:
postgresql-9.2.2.tar.gz
then push it up to the server and stage directory on our case /u02/software/postgres
tar -xzvf postgresql-9.2.2.tar.gz
cd into the postgresql-9.2.2 expanded directory
3) Compile and Configure PostgreSQL software:
create a quick script vi pg92configure.sh with
#!/bin/bash
./configure \
  --prefix=/u01/app/postgres/pgsql-9.2 \
  --with-perl
3) Build
chmod +x pg92configure.sh
./pg92configure.sh
The script will run for a bit then…
gmake world # to include all man html docs
.... it will take a long while for it to finish then...

PostgreSQL, contrib and HTML documentation successfully made. Ready to install.
or
PostgreSQL, contrib, and documentation successfully made. Ready to install.
4) Install
gmake install-world
once complete you’ll get this:
...
/bin/sh ../../config/install-sh -c  vacuumlo '/u01/app/postgres/pgsql-9.2/bin'
gmake[2]: Leaving directory `/u02/software/postgres/postgresql-9.2.2/contrib/vacuumlo'
gmake[1]: Leaving directory `/u02/software/postgres/postgresql-9.2.2/contrib'
PostgreSQL, contrib, and documentation installation complete.
5) Configure and customize a bit
Let’s create a start/stop script for PostgreSQL:
as root user cd /etc/init.d
vi stpostgresql
#!/bin/bash

# chkconfig: 2345 98 02
# description: PostgreSQL RDBMS 9.2

# where to find commands like su, echo, etc...
PATH=/usr/local/sbin:/usr/local/bin:/sbin:/bin:/usr/sbin:/usr/bin

DB_ENCODING=SQL_ASCII

DB_LOCALE=C

PG_INSTALL_DIR=/u01/app/postgres/pgsql-9.2

PG_DATA_DIR="${PG_INSTALL_DIR}/data"

PG_SERVER_LOG="$PG_DATA_DIR/serverlog"

PG_UNIX_USER=postgres

POSTGRES="$PG_INSTALL_DIR/bin/postgres"

PG_CTL="$PG_INSTALL_DIR/bin/pg_ctl"

INITDB="$PG_INSTALL_DIR/bin/initdb"

# die on first failure; do not keep trucking
set -e

if [ $# -ne 1 ]; then
    echo "please enter start/stop/restart etc..." 1>&2
    exit 1
fi

# Only start if we can find postgres and pg_ctl.
if [ ! -x $PG_CTL ]; then
    echo "$PG_CTL not found" 1>&2
    exit 1
fi

if [ ! -x $POSTGRES ]; then
    echo "$POSTGRES not found" 1>%amp;2
    exit 1
fi

case $1 in
  init)
	su - $PG_UNIX_USER -c "$INITDB --pgdata='$PG_DATA_DIR' --encoding=$DB_ENCODING --locale=$DB_LOCALE"
	;;
  start)
	echo -n "Starting PostgreSQL: "
	su - $PG_UNIX_USER -c "$PG_CTL start -D '$PG_DATA_DIR' -l $PG_SERVER_LOG &"
	echo "ok"
	;;
  stop)
	echo -n "Stopping PostgreSQL: "
	su - $PG_UNIX_USER -c "$PG_CTL stop -D '$PG_DATA_DIR' -s -m fast"
	echo "ok"
	;;
  restart)
	echo -n "Restarting PostgreSQL: "
	su - $PG_UNIX_USER -c "$PG_CTL stop -D '$PG_DATA_DIR' -s -m fast -w"
	su - $PG_UNIX_USER -c "$PG_CTL start -D '$PG_DATA_DIR' -l $PG_SERVER_LOG &"
	echo "ok"
	;;
  reload)
        echo -n "Reload PostgreSQL: "
        su - $PG_UNIX_USER -c "$PG_CTL reload -D '$PG_DATA_DIR' -s"
        echo "ok"
        ;;
  status)
	su - $PG_UNIX_USER -c "$PG_CTL status -D '$PG_DATA_DIR'"
	;;
  *)
	# Print help
	echo "Usage: $0 {start|stop|restart|reload|status}" 1>&2
	exit 1
	;;
esac

exit 0
Get the script ready to run, but do not run it yet:
pgjira:/etc/init.d # chmod +x ./stpostgresql
Now let’s Configure the kernel params to allow postgres to use as much memory as it needs:
pgjira:/etc/init.d # cd
vi pg92-kernel-params.sh
#!/bin/bash

SYSCTL=/sbin/sysctl

echo "# add the output of this script to /etc/sysctl.conf,"
echo "# and then, as root, run"
echo
echo "# sysctl -p /etc/sysctl.conf"
echo
echo "# to load change the kernel settings for these parameters."
echo

PAGE_SIZE=`getconf PAGE_SIZE`

echo "# page size is: $PAGE_SIZE"

NUM_PHYS_PAGES=`getconf _PHYS_PAGES`

echo "# number of physical pages on this box: $NUM_PHYS_PAGES"

CURR_SHMALL=`$SYSCTL -n kernel.shmall`
PREF_SHMALL=`expr $NUM_PHYS_PAGES / 2`

echo "# kernel.shmall should be half of the number of pages. Current kernel.shmall, in pages, is: $CURR_SHMALL"
echo "# kernel.shmall should be:"
echo
echo "kernel.shmall = $PREF_SHMALL"
echo

CURR_SHMMAX=`$SYSCTL -n kernel.shmmax`
PREF_SHMMAX=`expr $PREF_SHMALL \* $PAGE_SIZE`

echo "# kernel.shmmax should be half of available RAM, in kB. Current kernel.shmmax, in kB, is: $CURR_SHMMAX"
echo "# kernel.shmmax should be:"
echo
echo "kernel.shmmax = $PREF_SHMMAX"
echo

# CURR_SHMMIN=`$SYSCTL -n kernel.shmmin`  # XXX: does not exist on linux
# CURR_SHMSEG=`$SYSCTL -n kernel.shmseg`  # XXX: does not exist on linux

CURR_SHMMNI=`$SYSCTL -n kernel.shmmni`

echo "# kernel.shmmni is usually set to a sane amount on Linux. Currently, it is: $CURR_SHMMNI"

# CURR_SEMMNI=`$SYSCTL -n kernel.semmni`  # XXX: does not exist on linux
# CURR_SHMMNI=`$SYSCTL -n kernel.semmns`  # XXX: does not exist on linux
# CURR_SHMMSL=`$SYSCTL -n kernel.semmsl`  # XXX: does not exist on linux
# CURR_SHMMSL=`$SYSCTL -n kernel.semmap`  # XXX: does not exist on linux
# CURR_SHMMSL=`$SYSCTL -n kernel.semmvx`  # XXX: does not exist on linux

CURR_SEM=`$SYSCTL -n kernel.sem`

echo "# kernel.sem usually has sane defauls. They are currently: $CURR_SEM"
Now let’s make pg92-kernel-params.sh executable:
chmod +x ./pg92-kernel-params.sh
and now let’s run it:
pgjira:~ # ./pg92-kernel-params.sh
And the output is:
# and then, as root, run

# sysctl -p /etc/sysctl.conf

# to load change the kernel settings for these parameters.

# page size is: 4096
# number of physical pages on this box: 1790068
# kernel.shmall should be half of the number of pages. Current kernel.shmall, in pages, is: 2097152
# kernel.shmall should be:

kernel.shmall = 895034

# kernel.shmmax should be half of available RAM, in kB. Current kernel.shmmax, in kB, is: 33554432
# kernel.shmmax should be:

kernel.shmmax = 3666059264

# kernel.shmmni is usually set to a sane amount on Linux. Currently, it is: 4096
# kernel.sem usually has sane defauls. They are currently: 250  32000   32      128
02/07/2013 23:38:07 postgres:pgjira:/u02/software/postgres/postgresql-9.2.2~>  *** Pre-production System Be Careful ***
So the I follow the advise of the output and I just added “kernel.shmmax = 3666059264” as root at the end of the sysctl.conf file
su –
02/07/2013 23:46:22 root:pgjira:/etc/init.d~# *** Pre-production System Be Careful ***
#vi /etc/sysctl.conf
wq!
And now I make the changes take effect for all current session without having to reboot the box/server:
02/07/2013 23:46:22 root:pgjira:/etc/init.d~#   *** Pre-production System Be Careful ***
#sysctl -p /etc/sysctl.conf
kernel.sysrq = 0
net.ipv4.ip_forward = 0
net.ipv4.tcp_syncookies = 1
net.ipv6.conf.all.forwarding = 0
kernel.shmmax = 3666059264
exit back to postgres user:
cd /u01/app/postgres/pgsql-9.2/bin
./initdb –pgdata=/u01/app/postgres/pgsql-9.2/data
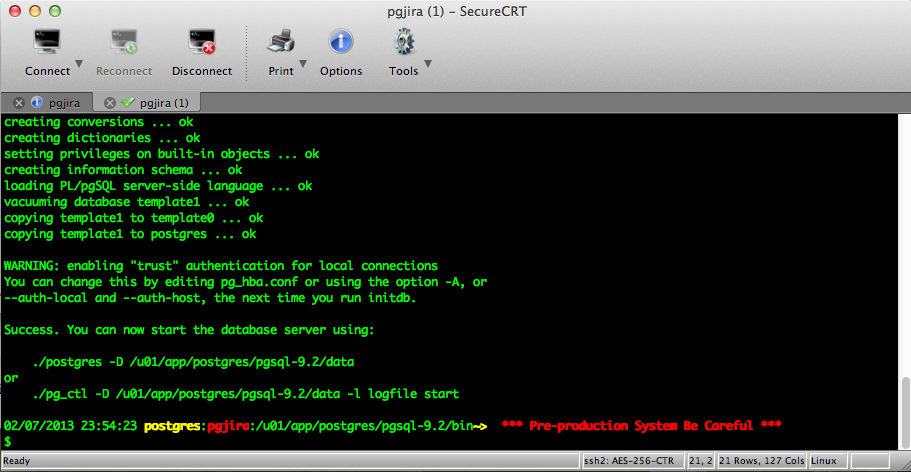
You’ll have a similar output as on following screens:
…Screens
PostgreSQL_Greenplum1
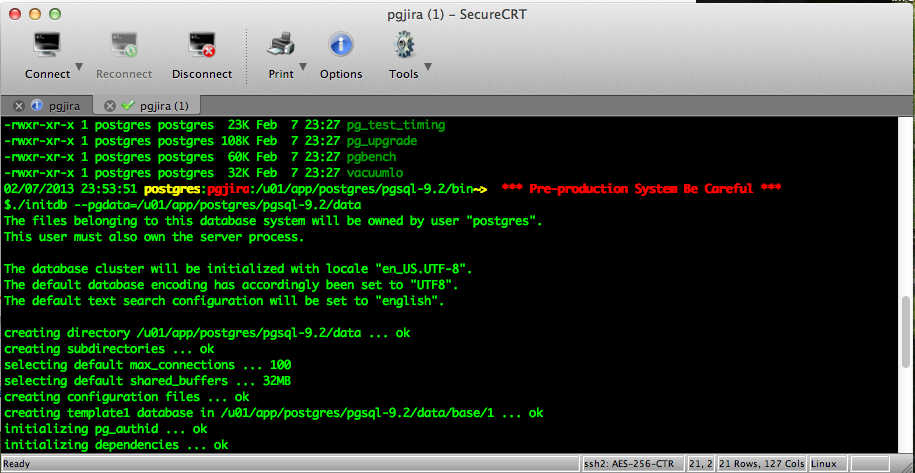
PostgreSQL_Greenplum1
WARNING: enabling "trust" authentication for local connections
You can change this by editing pg_hba.conf or using the option -A, or
--auth-local and --auth-host, the next time you run initdb.

Success. You can now start the database server using:

    ./postgres -D /u01/app/postgres/pgsql-9.2/data
or
    ./pg_ctl -D /u01/app/postgres/pgsql-9.2/data -l logfile start
…Screens
PostgreSQL_Greenplum2
postgreSQL_Greenplum2
Let’s configure some basic database settings:
postgres@pgjira:/u01/app/postgres/pgsql-9.2/bin> cd ../data/
vi postgresql.conf


listen_address='localhost'  ==>  listen_address='*'

# according to http://rhaas.blogspot.com/2012/03/tuning-sharedbuffers-and-walbuffers.html,
# shared_buffers should be 25% of RAM, but no higher than 8GB.

shared_buffers = 32MB  ==>  shared_buffers = 8GB

temp_buffers = 8MB  ==>  temp_buffers = 80MB

work_mem = 1MB  ==>  work_mem = 1GB  # set higher on a per-session basis

maintenance_work_mem = 16MB  ==>  maintenance_work_mem = 20GB  # set quite high; used to build indexes and do data loads

# according to http://rhaas.blogspot.com/2012/03/tuning-sharedbuffers-and-walbuffers.html,
# wal_buffers should be 3% of shared_buffers up to a maximum of 16MB, the size of a single WAL segment.

wal_buffers = 64kB  ==>  wal_buffers = 16MB

# according to https://www.packtpub.com/article/server-configuration-tuning-postgresql,
# checkpoint segments should be much higher than the default of 3:

checkpoint_segments = 3  ==>  checkpoint_segments = 64

# if you are on RAID 10, the cost of accessing a random page should be much closer to the cost
# of sequential IO. (In fact, if you are on SSDs, seq_page_cost and random_page_cost should equal each other.)

random_page_cost = 4.0  ==>  random_page_cost = 2.0

# according to http://wiki.postgresql.org/wiki/Tuning_Your_PostgreSQL_Server,
# "Setting effective_cache_size to 1/2 of total memory would be a normal conservative setting,
# and 3/4 of memory is a more aggressive but still reasonable amount."

effective_cache_size = 128MB  ==>  effective_cache_size = 37GB

# settings for logging:
log_destination = 'stderr'
logging_collector = on
log_directory = 'pg_log'
log_filename = 'postgresql-%Y-%m-%d_%H%M%S.log'
log_truncate_on_rotation = on
log_rotation_age = 1d
log_rotation_size = 0
log_min_messages = debug1  # obviously rather verbose; drop to warning if your logs fill up
log_line_prefix = '%t'
Now we need to edit the pg_hba.conf and almost there:
use steps in:
So we’ll need to do some adjustments to expand remote client connectivity using RSA and VPN security Tunneling. Let’s revisit the /var/lib/pgsql/data/pg_hba.conf file and add a line as follow at the end of the file:
Tutorial to Install and Configure PostgreSQL in OpenSUSE 12 Part2
To make sure postgreSQL server is accepting remote connections:
sudo lsof -i -P | grep -i ‘:5432’
you should see something like:
02/07/2013 00:51:39 postgres:pgjira:/home/postgres~>  *** Pre-production System Be Careful ***
$sudo lsof -i -P | grep -i ':5432'
postgres  31259 postgres    3u  IPv4  53402      0t0  TCP *:5432 (LISTEN)
postgres  31259 postgres    4u  IPv6  53403      0t0  TCP *:5432 (LISTEN)
postgres  32162 postgres   10u  IPv4  57835      0t0  TCP pgjira.urimagination.com:5432->172.16.1.85:61355 (ESTABLISHED)
02/07/2013 00:52:37 postgres:pgjira:/home/postgres~>  *** Pre-production System Be Careful ***
PostgreSQL_Greenplum3

PostgreSQL_Greenplum3
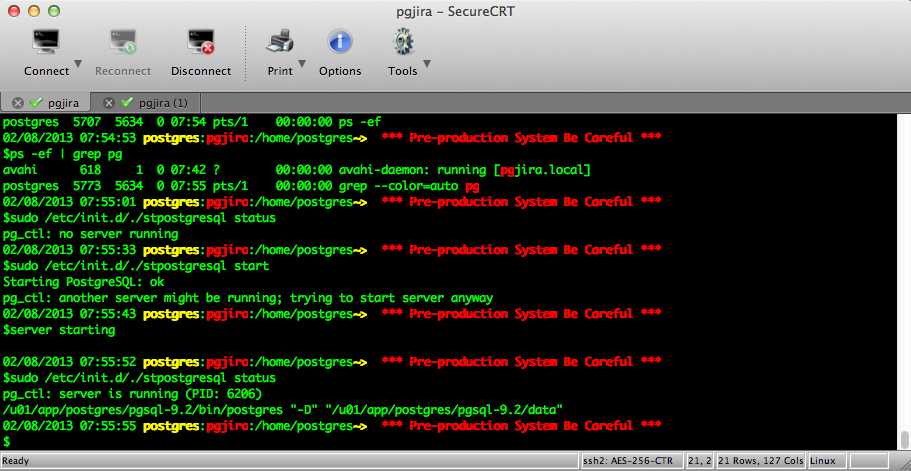
Now let’s start PostgreSQL:
Now become root again:
And start PostgreSQL!
<< 02/07/2013 23:51:58 root:pgjira:/etc/init.d~# *** Pre-production System Be Careful *** #./stpostgresql start Starting PostgreSQL: ok 02/07/2013 00:15:17 root:pgjira:/etc/init.d~# *** Pre-production System Be Careful *** #server starting 02/07/2013 00:15:22 root:pgjira:/etc/init.d~# *** Pre-production System Be Careful *** #./stpostgresql status pg_ctl: server is running (PID: 31259) /u01/app/postgres/pgsql-9.2/bin/postgres “-D” “/u01/app/postgres/pgsql-9.2/data” 02/07/2013 00:15:28 root:pgjira:/etc/init.d~# *** Pre-production System Be Careful *** # >>
…Screens
PostgreSQL_Greenplum4
PostgreSQL_Greenplum4
Now let’s make a database user and a test database
postgres@pgjira:/u01/app/postgres/pgsql-9.2/bin> ./psql template1
$./psql template1
psql (9.2.2)
Type "help" for help.

template1=# create user postgres2 superuser createdb createrole password 'xxxxx';
CREATE ROLE
template1=#

now make a database:
postgres@pgjira:/u01/app/postgres/pgsql-9.2/bin> ./psql -U postgres template1
psql (9.2.2)
Type "help" for help.

template1=# create database pgdbtest with owner postgres2;

A)
PGDBTEST:
CREATE TABLESPACE pgdbtesttbs1
OWNER postgres2
LOCATION '/u02/data/postgres/dbase/pgdbtest';

POSTGRES:
CREATE TABLESPACE postgrestbs1
OWNER postgres
LOCATION '/u02/data/postgres/dbase/postgres';

B)
PGDBTEST:
ALTER DATABASE pgdbtest
SET TABLESPACE pgdbtesttbs1;

POSTGRES:
ALTER DATABASE postgres
SET TABLESPACE postgrestbs1;
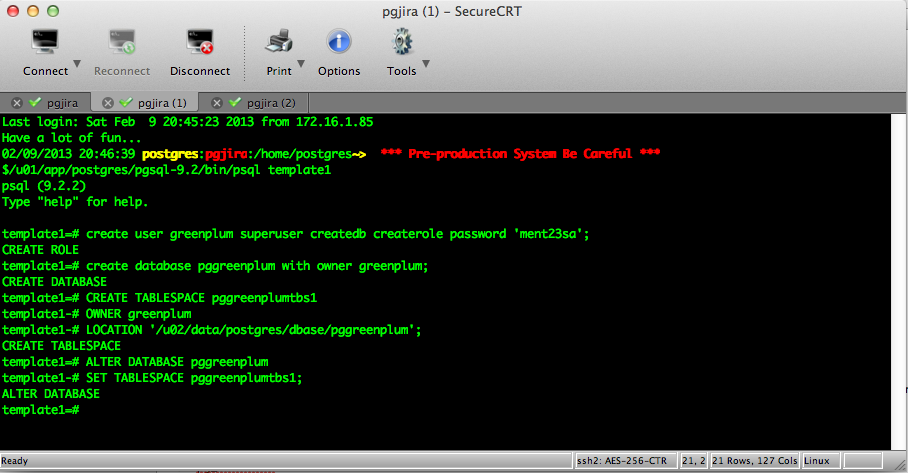
Greenplum Data Warehouse database:
First let’s create the Greenplum user:
$/u01/app/postgres/pgsql-9.2/bin/psql template1
psql (9.2.2)
Type "help" for help.
template1=# create user greenplum superuser createdb createrole password 'xxxxx';
CREATE ROLE
template1=#

Second let's create the database for the Greenplum DW project:

template1=# create database pggreenplum with owner greenplum;
CREATE DATABASE

Next let's create a dedicated tablespace for the Greenplum project, let's start with:

mkdir -p /u02/data/postgres/dbase/pggreenplum

GREENPLUM:
CREATE TABLESPACE pggreenplumtbs1
OWNER greenplum
LOCATION '/u02/data/postgres/dbase/pggreenplum';

CREATE TABLESPACE # this the output after above statement has completed the execution.

Now let's assign the Greenplum database with it's default tablespace

ALTER DATABASE pggreenplum
SET TABLESPACE pggreenplumtbs1;
So all is done with our Greenplum database data warehouse project, well at least with the core database at this point. Working with GreenPlum a product Data Warehouse machine from EMC for Big Data project it’s out the scope of this article.
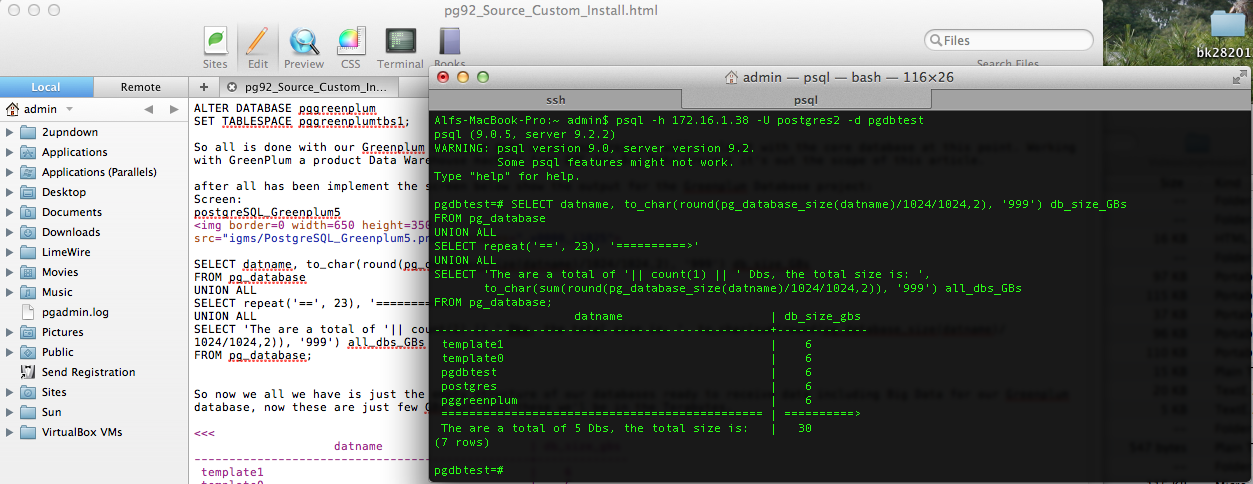
after all has been implement the screen below show the output for the Greenplum Database project:
Screen:
postgreSQL_Greenplum5
PostgreSQL_Greenplum5
SELECT datname, to_char(round(pg_database_size(datname)/1024/1024,2), '999') db_size_GBs                                                                                         FROM pg_database
UNION ALL
SELECT repeat('==', 23), '==========>'
UNION ALL
SELECT 'The are a total of '|| count(1) || ' Dbs, the total size is: ', to_char(sum(round(pg_database_size(datname)/1024/1024,2)), '999') all_dbs_GBs
FROM pg_database;
So now we all we have is just the empty structure of our databases ready to receive data including Big Data for our Greenplum database, now these are just few GBs but soon these we’l be in the Terabytes.
<<<
                    datname                     | db_size_gbs
------------------------------------------------+-------------
 template1                                      |    6
 template0                                      |    6
 pgdbtest                                       |    6
 postgres                                       |    6
 pggreenplum                                    |    6
 ============================================== | ==========>
 The are a total of 5 Dbs, the total size is:   |   30
(7 rows)
>>>
PostgreSQL_Greenplum6
PostgreSQL_Greenplum6
Basic assumptions:
Server Build: Space/Memory Requirements: 75Gs
Severs name: “pgjira and greenplum”
pgjira.urimagination.com
greenplum.urimagination.com
OS: openSuSe Server 12.2
Each will have the following configuration:
Space Requirements:
Mount Point   Size
/                    28Gs     --For root
/boot                500Ms    --For boot
/dev/shm             11Gs     --This could be less
/Swap                32Gs
On our case we use 16GBs max, our physical RAM on each server is 75GBs
We use this guidelines to set the swap on our systems:
Systems with 4GB of ram or less require a minimum of 2GB or Max 8GB of swap space
Systems with 4GB to 16GB of ram require a minimum of 4GB or Max 32GB of swap space
Systems with 16GB to 64GB of ram require a minimum of 8GB of swap space
Systems with 64GB to 256GB of ram require a minimum of 16GB of swap space

/home 	             18Gs
SAN Storage.....:
Mount Point:  Size
/u01              1TBs
/u02              1TBs
/u03			  1TBs
/u04			  1TBs
/u05			  1TBs
Brief management and status check commands:
1. Restart Greenplum Database:
$gpstop -r
2. After the system restarts, run gprecoverseg:
$ gprecoverseg
3. After gprecoverseg completes, use gpstate to check the status of your mirrors:
$gpstate -m
4. If you still have segments in Change Tracking mode, run a full copy recovery:
$gprecoverseg -F
Check for unbalanced segments run
$gpstate -e
1. Run gpstate -m to ensure all mirrors are Synchronized.
$gpstate -m
2. If any mirrors are in Resynchronizing mode, wait for them to complete.
3. Run gprecoverseg with the -r option to return the segments to their preferred roles.
$gprecoverseg -r
4. After rebalancing, run gpstate -e to confirm all segments are in their preferred roles.
$gpstate -e
Useful Commands:
gpstart
gpstop
gpstop -r ; Restart the database
gpstat -R ; Restrit move
gpstop -u ; reload the pg_posgresql.conf and pb_hba.conf files
gpstart -m ; start in utility mode
gpstop -m ; stop the utility mode
gpstar -R -m
gpstop -r -u -m
gpstate
gpstate -s; Show complete system configuration and status
gpstate -p; Ports used by the system
gpstate -m; segment mirror configuration
gpstate -c; Primary mirror mapping
gpstate -e; Show details on primary/mirror segment pairs that have potential issues
gpstate -i; Otain Greenplum database version information
Some Loading Data utilities:
gpfdist —-Parallel file distribution program
gpload —-laod data utility
gphdfs —-protocol for interacting with Hadoop
sql copy
sql insert
The gpcrondump backup utility automates the parallel backup of distributed gplum dbs across multiple segment servers